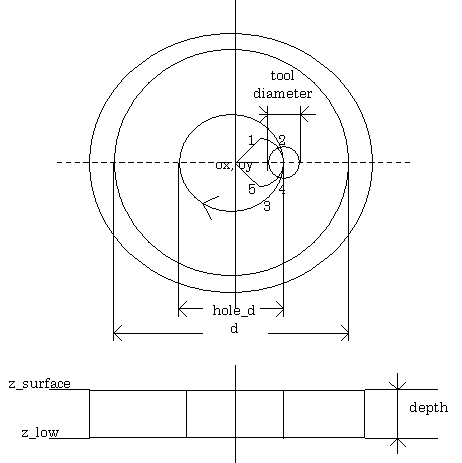
Figure - 4.3.3 full circle cutting m_cmil

In general, any product is manufactured through several machining procedures, each procedure further divided into some generic machining procedures. Starting from rough cutting to remove raw materials, product is machined in sucession through various cutting steps until finish cutting is executed.
Tapping procedure, for example, is achieved through combination of 3 machining steps, i.e. center drilling, drilling and tapping. Each step is executed through fundamental machining functions, such as the spindle rotation, rapid traverse or feed cutting .
Thus, in addition to decide machining dimensions of the work, selection of the machining algorithm plays an important role in the shop floor.
Up to now, these functions have been achieved through proprietary interactive programming systems devised for each machine tools, in which specification have been presented by machine tool builders , and real development executed by NC builders.
In OSEC, FADL interpreter language is employed to provide means for machine tool builders to develope these functions by themselves, making and classifying the NC machining libraries.
A sample of NC machining class library is shown in Figure-4.3.1. There may be several kinds of method to classify NC machining process. In OSEC, NC machining is classified into following 3 levels;
| functions | descriptions |
| 1) new | initial set |
| 2) p_sfra | milling ( layer 1 ) |
| 3) p_cmil | full circle / chamfering( layer 2 ) |
| 4) p_lmil | side end milling( layer 3 ) |
| 5) p_ctap | tapping around circle( layer 4 ) |
| 6) p_sztap | through tapping with seat( layer 5 ) |
| 7) m_fini | finish |
| 8) m_toolchg | macro for tool change |
(2) machining level ( class NC )
| functions | descriptions |
| 1) speed | feedrate |
| 2) spindle | spindle cw/ccw/stop |
| 3) move | rapid traverse |
| 4) line | linear interpolation |
| 5) arc2,3 | circular interpolationCW,CCW |
| 6) toolselect | tool select |
| 7) drilling | drilling |
| 8) tapping | tapping |
| 9) reference | 2nd grid |
| 10) toolchange | tool change |
| 11) GetToolData | get tool file data |
(3) machining level ( class FA )
| functions | descriptions |
| 1) Coordinate | coordinate transformation |
| 2) Axis_Move | axis movement |
| 3) Axis_Vspeed | axis speed |
| 4) Axis_Arc | axis arc mivement |
| 5) Axis_Start | axis motion start |
| 6) Axis_Stop | axis motion stop |
| initial | reference point | x y z |
| clearence height | ||
| radius for through tapping | ||
| start angle | ||
| depth of cut | ||
| number of holes | ||
| center drilling | tool number | |
| radius | ||
| start angle | ||
| bottom of hole | ||
| R point | ||
| feedrate | ||
| repeat number | ||
| through holing | tool number | |
| radius | ||
| start angle | ||
| bottom of hole | ||
| R point | ||
| feedrate | ||
| repeat number | ||
| tapping | tool number | |
| radius | ||
| start angle | ||
| bottom of hole | ||
| R point | ||
| feedrate | ||
| repeat number |
Interpreter language assures far high degree of freedom to make machining libraries, compared to the foregoing macro programming language.
It gives machine tool builders the possibility to afford effective programming means
( i.e. machine tool utilizing means ) , corresponding to the customer's various requirements.
Figure-4.3.3 shows a sample program for full circle cutting, which is used in the demonstration.
